Train a model locally
This is a step by step guide on how to train a module from the Marketplace with your own dataset.
Requirements
- having Docker installed. For an up-to-date installation please follow the official Docker installation guide.
- Optional: having a DEEP IAM account if you want to use remote storage resources.
1. Choose your module
The first step is to choose a module from the DEEP Open Catalog marketplace. For educational purposes we are going to use a general model to identify images. This will allow us to see the general workflow.
Once we have chosen the model at the DEEP Open Catalog marketplace we will
find that it has an associated docker container in DockerHub. For example, in the
example we are running here, the container would be deephdc/deep-oc-image-classification-tf. So let’s pull the
docker image from DockerHub:
$ docker pull deephdc/deep-oc-image-classification-tf
Docker images have usually tags depending on whether they are using master or test and whether they use
cpu or gpu. Tags are usually:
latestorcpu: master + cpugpu: master + gpucpu-test: test + cpugpu-test: test + gpu
So if you wanted to use gpu and the test branch you could run:
$ docker pull deephdc/deep-oc-image-classification-tf:gpu-test
Instead of pulling from Dockerhub you can choose to build the image yourself:
$ git clone https://github.com/deephdc/deep-oc-image-classification-tf
$ cd deep-oc-image-classification-tf
$ docker build -t deephdc/deep-oc-image-classification-tf .
Tip
It’s usually helpful to read the README in the source code of the module, in this case located at https://github.com/deephdc/image-classification-tf.
2. Store your data
To run locally you have two options:
- Have your data stored locally
- Have your data at a remote storage resource
Have your data stored locally
You should make sure that you export inside of the container all the folders you need for the training
$ docker run -ti -p 5000:5000 -p 6006:6006 -v path_to_local_folder:path_to_docker_folder deephdc/deep-oc-image-classification-tf
Have your data at a remote storage resource
For the time being we support using the DEEP Nextcloud for remote storage, although we plan to support addition platforms such as Google Drive, Dropbox and OneData. All of these platforms are supported through rclone.
If you have the files you need for the training stored in Nextcloud you need first to login into DEEP-Nextcloud with your DEEP-IAM credentials. Then you have to go to: (1) Settings (top right corner) → (2) Security → (3) Devices & sessions
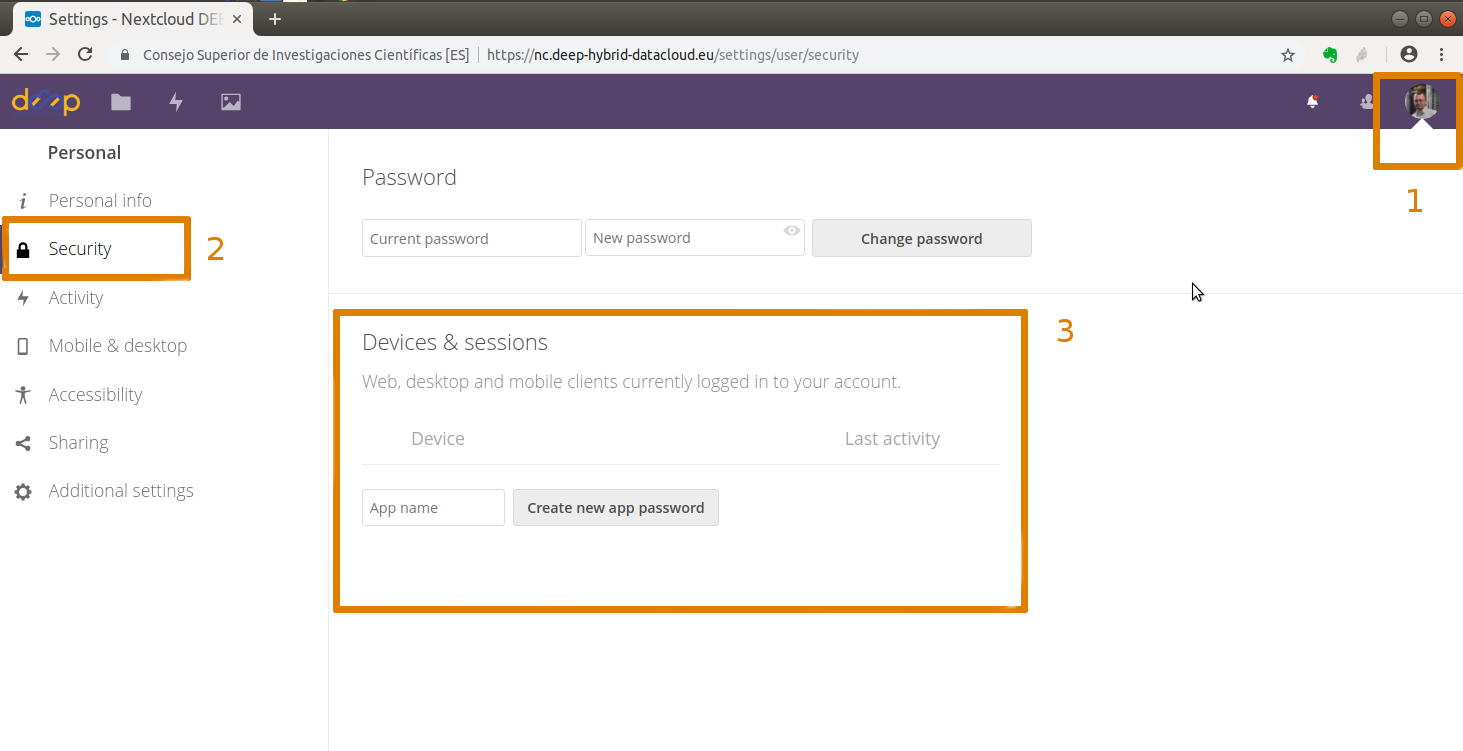
Set a name for your application (for this example it will be rshare) and clik on Create new app password.
This will generate <your_nextcloud_username> and <your_nextcloud_password> that you should to include in your
rclone.conf file (see more details). Now you can create the folders that you need in order to data
the inputs needed for the training.
Tip
When developing a model you should add some code to perform a sync to be able to see locally your remote data.
If you are using a trainable module from the Marketplace that you have not developed yourself you can skip
this tip as this will have been taken care of.
In order to be able to see your NextCloud folders from your docker, you should run rclone from your module’s code, which will synchronize your NextCloud contents with your local contents (or the other way around). It is kind of an rsync but for remote storage.
So your module should run this synchronization before the train() function tries to access data.
To run it from inside a python script you can use the following code:
import subprocess

def sync_nextcloud(frompath, topath):
    """
    Mount a NextCloud folder in your local machine or viceversa.
    """
    command = (['rclone', 'copy', frompath, topath])
    result = subprocess.Popen(command, stdout=subprocess.PIPE, stderr=subprocess.PIPE)
    output, error = result.communicate()
    if error:
        warnings.warn("Error while mounting NextCloud: {}".format(error))
    return output, error

sync_nextcloud('rshare:/your/dataset/folder', '/your/data/path/inside/the/container') # sync local with nextcloud
sync_nextcloud('/your/data/path/inside/the/container', 'rshare:/your/dataset/folder') # sync nextcloud with local
As you can see you can sync the local contents back to NextCloud, which is useful if you want to save your trained model back to NextCloud.
When running the container you should export the rclone.conf file so that it can be reached from within the docker.
You can see an example on how to do this here
$ docker run -ti -p 5000:5000 -p 6006:6006 -v host_path_to_rclone.conf:/root/.config/rclone/rclone.conf deephdc/deep-oc-image-classification-tf
You can see this last step explained more in detail here.
We are using the port 5000 to deploy the API and the port 6006 to monitor the training (for example using
Tensorboard).
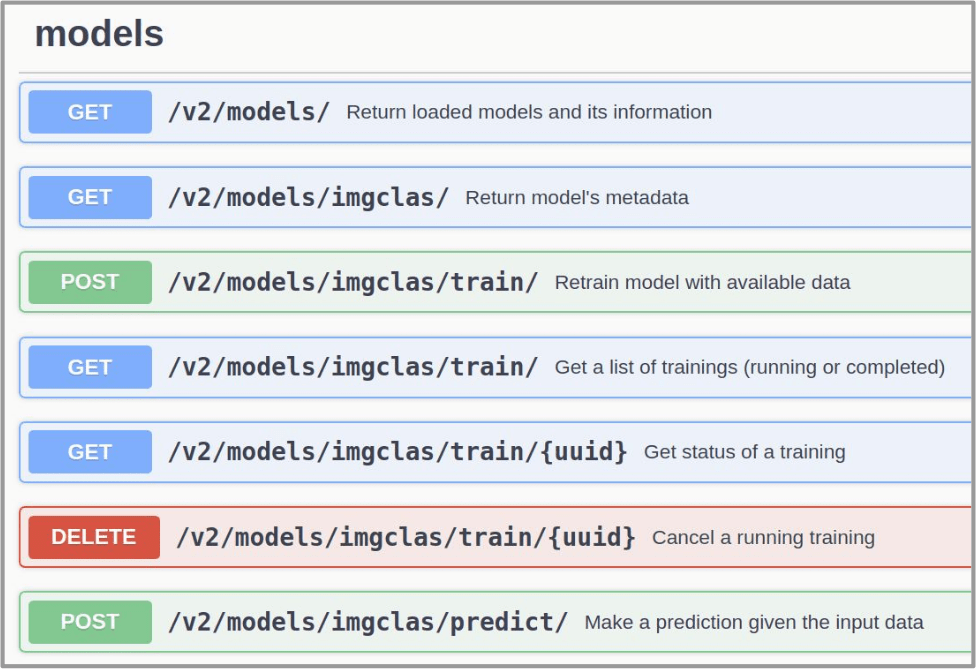
3. Train the model
Now comes the fun! Go to http://0.0.0.0:5000/ui and look for the train method. Modify the training parameters you wish to
change and execute. If some kind of monitorization tool is available for this model you will be able to follow the training
progress from http://0.0.0.0:6006.
Once the training has finished, you can directly test it by clicking on the predict method.
Upload the image your want to classify and check on the predicted classes.