Attention
The DEEP platform is sunsetting.
The DEEP-Hybrid-DataCloud project project has ended and its plaftform and software are being decomissioned during 2023, as they have been superseeded by the AI4EOSC platform and the AI4OS software stack.
Please refer to the following links for further information:
How to use Nextcloud with rclone
rclone is a tool that enables you to synchronize contents between your machine and a remote storage. It is kind of an rsync but for remote storages. Although we will demonstrate here how to use it with Nextcloud, it can be used with many different remote storages (Dropbox, Google Drive, Amazon S3, etc)
Installing rclone
All applications in the DEEP Catalog are packed in a Docker image and have rclone installed by default. If you want to create a Docker containing your own application, you should install rclone in the container to be able to access the data stored remotely. When developing an application with the DEEP Modules Template, the Dockerfile already includes installation of rclone.
To install rclone on a Docker container based on Ubuntu you should add the following code:
# Install rclone (needed if syncing with NextCloud for training; otherwise remove)
RUN curl -O https://downloads.rclone.org/rclone-current-linux-amd64.deb && \
    dpkg -i rclone-current-linux-amd64.deb && \
    apt install -f && \
    mkdir /srv/.rclone/ && \
    touch /srv/.rclone/rclone.conf && \
    rm rclone-current-linux-amd64.deb && \
    rm -rf /var/lib/apt/lists/*
To install it directly on your machine:
$ curl -O https://downloads.rclone.org/rclone-current-linux-amd64.deb
$ dpkg -i rclone-current-linux-amd64.deb
$ apt install -f
$ rm rclone-current-linux-amd64.deb
For other Linux flavors, please refer to the rclone official site.
Configuring rclone
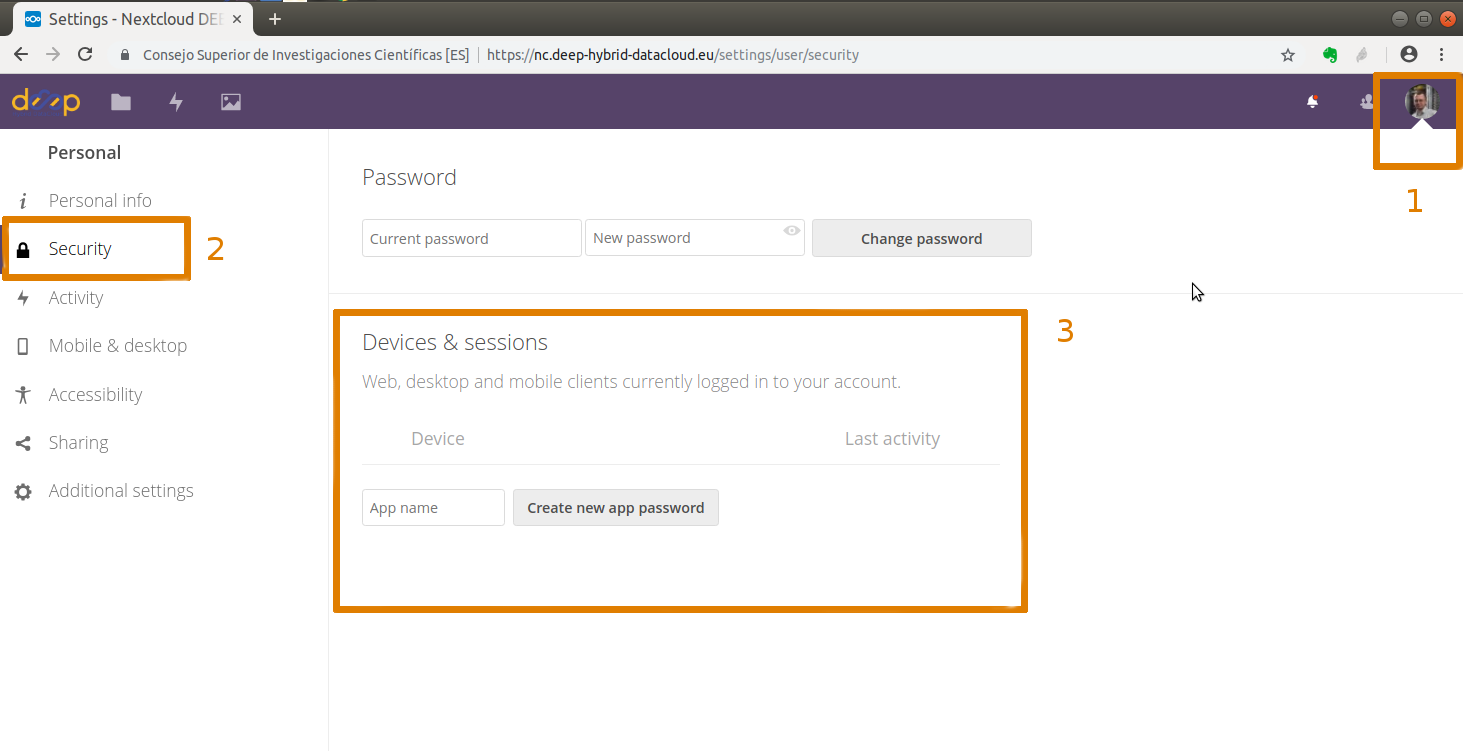
After login into DEEP-Nextcloud with your DEEP-IAM credentials, go to
(1) Settings (top right corner) ➜ (2) Security ➜ (3) Devices & sessions. Set a name for your
application (typically in the docs we will use rshare) and click on Create new app password.
This will generate your <user> and <password> credentials. Your username should start with DEEP-IAM-....
Now you have several options to configure rclone:
Configuring via env variables (Dashboard users)
If your are creating a deployment from the Dashboard, then you only need to fill the
rclone_user and rclone_password parameters in the configuration form (Storage options) and we will
automatically set up rclone configuration for you via setting environment variables.
Once you machine is launched, you must run the following command in the terminal to properly configure rclone:
$ echo export RCLONE_CONFIG_RSHARE_PASS=$(rclone obscure $RCLONE_CONFIG_RSHARE_PASS) >> /root/.bashrc
$ source /root/.bashrc
This is because, to connect with the remote, rclone needs to use an obscured version of the password, not the raw one.
You can always check those env variables afterwards:
$ printenv | grep RCLONE_CONFIG_RSHARE_
RCLONE_CONFIG_RSHARE_VENDOR=nextcloud
RCLONE_CONFIG_RSHARE_PASS=***some-password***
RCLONE_CONFIG_RSHARE_URL=https://data-deep.a.incd.pt/remote.php/webdav/
RCLONE_CONFIG_RSHARE_TYPE=webdav
RCLONE_CONFIG_RSHARE_USER=***some-user***
and modify them if needed:
$ export RCLONE_CONFIG_RSHARE_PASS=***new-password*** # remember this should an obscured version of the raw password --> `rclone obscure <raw-password>`
Configuring via rclone config (local development)
If you are developing in a Docker container deployed in your local machine,
one can use instead the rclone config command that will create a configuration file (rclone.conf) for rclone.
First, make sure you don’t have a remote with the same name already configured, as names will collide.
$ rclone listremotes
This should return an empty output. If this is not the case, make sure you don’t have a remote configured via environment variables (previous section), which is the case if you are running this in a Dashboard deployment. To clear that remote, you just need to unset the variables:
$ echo 'unset RCLONE_CONFIG_RSHARE_VENDOR RCLONE_CONFIG_RSHARE_PASS RCLONE_CONFIG_RSHARE_URL RCLONE_CONFIG_RSHARE_TYPE RCLONE_CONFIG_RSHARE_USER' >> ~/.bashrc
$ source ~/.bashrc
Then run rclone config and answer the questions to configure the new remote:
$ rclone config
choose "n"  for "New remote"
choose name for DEEP-Nextcloud --> rshare
choose "Type of Storage" --> Webdav
provide DEEP-Nextcloud URL for webdav access --> https://data-deep.a.incd.pt/remote.php/webdav/
choose Vendor --> Nextcloud
specify "user" --> (see `<user>` in "Configuring rclone" above).
password --> y (Yes type in my own password)
specify "password" --> (see `<password>` in "Configuring rclone" above).
bearer token --> ""
Edit advanced config? --> n (No)
Remote config --> y (Yes this is OK)
Current remotes --> q (Quit config)
This will create an configuration file like the following:
[rshare]
type = webdav
url = https://data-deep.a.incd.pt/remote.php/webdav/
vendor = nextcloud
user = ***some-username***
pass = ***some-userpassword**  --> this is equivalent to `rclone obscure <password>`
By default:
if you are on your local machine or inside a local Docker container,
rclone.confis created in$HOME/.config/rclone/rclone.conf.if you are inside a Dashboard deployment,
rclone.confis created in/srv/.rclone/rclone.conf.
For security reasons, the rclone.conf should never be saved as part of the Docker image. If you are running rclone from inside a Docker container, you should mount rclone.conf at runtime directly as a volume.
$ docker run -ti -v $HOSTDIR_WITH_RCLONE_CONF/rclone.conf:/$HOME/.config/rclone/rclone.conf <your-docker-image>
One can also mount the rclone.conf file at a custom location and tell rclone where to find it:
$ docker run -ti -v $HOSTDIR_WITH_RCLONE_CONF/rclone.conf:/custom/path/to/rclone.conf <your-docker-image>
$ rclone --config /custom/path/to/rclone.conf
Using rclone
You can check that everything works fine with:
$ rclone listremotes    # check you don't have two remote storages with same name
$ rclone about rshare:  # should output your used space in Nextcloud.
Tip
If listremotes is listing two remotes with the same name you probably configured the rclone twice.
Most likely you ran rclone config on a machine deployed with the Dashboard, so you
have both the env and rclone.conf configurations. To fix this, either remove the env variables
(echo unset command into the .bashrc) or delete the rclone.conf file.
You can start copying files from your remote to your local:
$ rclone copy rshare:/some/remote/path /some/local/path
Tip
Uploading to Nextcloud can be particularly slow if your dataset is composed of lots of small files. Considering zipping your folder before uploading.
$ zip -r <foldername>.zip <foldername>
$ unzip <foldername>.zip