Attention
The DEEP platform is sunsetting.
The DEEP-Hybrid-DataCloud project project has ended and its plaftform and software are being decomissioned during 2023, as they have been superseeded by the AI4EOSC platform and the AI4OS software stack.
Please refer to the following links for further information:
Quickstart Guide
Go to the DEEP Marketplace
Browse available modules.
Find the module you are interested in and get it
Let’s explore what we can do with it!
Run a module locally
Requirements
This section requires having docker installed.
Starting from version 19.03 docker supports NVIDIA GPUs (see here and here). If you happen to be using an older version you can give a try to nvidia-docker
If you need to use docker in an environment without root privileges (eg. an HPC cluster) check udocker instead of docker.
Run the container
We will pull the containers directly from DockerHub.
Running on CPUs:
with docker:
$ docker run -ti -p 5000:5000 -p 6006:6006 deephdc/deep-oc-module_of_interest
with udocker:
$ udocker run -p 5000:5000 -p 6006:6006 deephdc/deep-oc-module_of_interest
Running on GPUs:
with docker (19.03 or above):
$ docker run -ti --gpus all -p 5000:5000 -p 6006:6006 deephdc/deep-oc-module_of_interest
with nvidia-docker:
$ nvidia-docker run -ti -p 5000:5000 -p 6006:6006 deephdc/deep-oc-module_of_interest
with udocker (GPU support enabled):
$ udocker pull deephdc/deep-oc-module_of_interest
$ udocker create --name=module_of_interest deephdc/deep-oc-module_of_interest
$ udocker setup --nvidia module_of_interest
$ udocker run -p 5000:5000 -p 6006:6006 module_of_interest
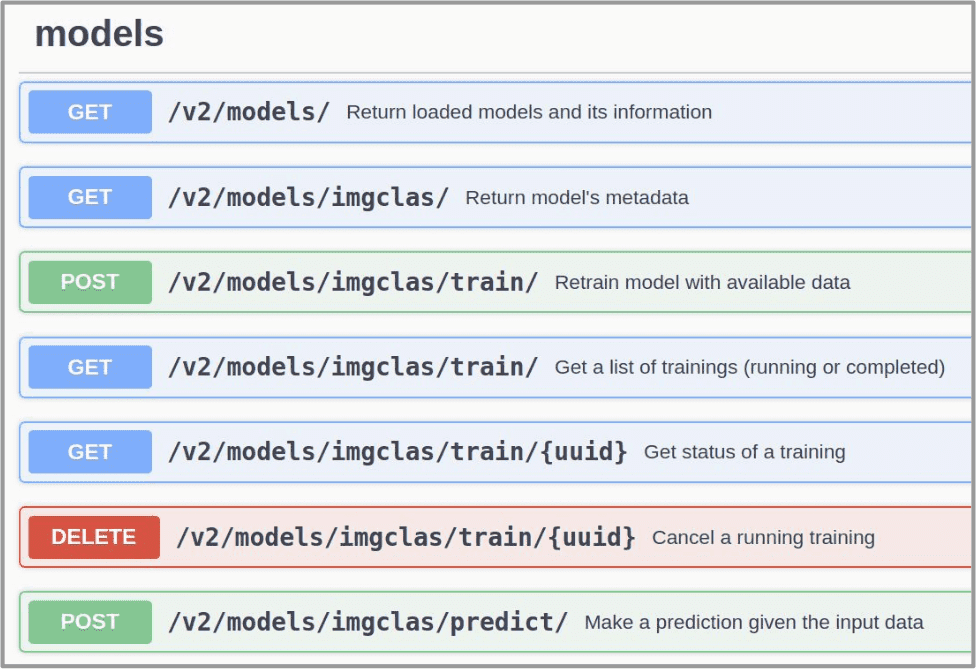
Access the module via API
Once you have your container running, you have to access the downloaded module via the DEEPaaS API. In your web browser go to http://0.0.0.0:5000/ui and start trying the module.
If you are training a model, you can go to http://0.0.0.0:6006 to monitor the training progress (if such monitoring is available for the model).
For more details on particular models, please read the module’s documentation
(see the Marketplace page of the module or the README of the code repository).
Related HowTo’s:
Train a module on DEEP Dashboard
Requirements
For accessing the Dashboard, you will need to register a DEEP-IAM credential.
Sometimes running a module locally is not enough as one may need more powerful computing resources (like GPUs) in order to train a module faster. For that you can use the DEEP Dashboard.
In the Dashboard select a module you want to run and the computing resources you need. Once you have your module deployed, you will be able to train the module and view the training history.

Related HowTo’s: