Attention
The DEEP platform is sunsetting.
The DEEP-Hybrid-DataCloud project project has ended and its plaftform and software are being decomissioned during 2023, as they have been superseeded by the AI4EOSC platform and the AI4OS software stack.
Please refer to the following links for further information:
DEEP Dashboard
The DEEP dashboard allows users to access computing resources to deploy, perform inference, and train modules hosted at the DEEP Open Catalog, as well as deploying external Docker images hosted in Dockerhub. The Dashboard simplifies the deployment and hides some of the technical parts that most users do not need to worry about.
To be able to access the Dashboard you need to register for IAM credentials.
Selecting the modules
Once you log into the Dashboard, you are able to see all possible modules for deploying in the Modules (Marketplace) panel.
Those are basically:
all the Marketplace modules.
DEEP Development Environment: special module especially designed to develop new modules.Run your own module: deploy external docker images that are not part of the Marketplace

Making a deployment
Once you choose the module, you will be presented with the module’s information:
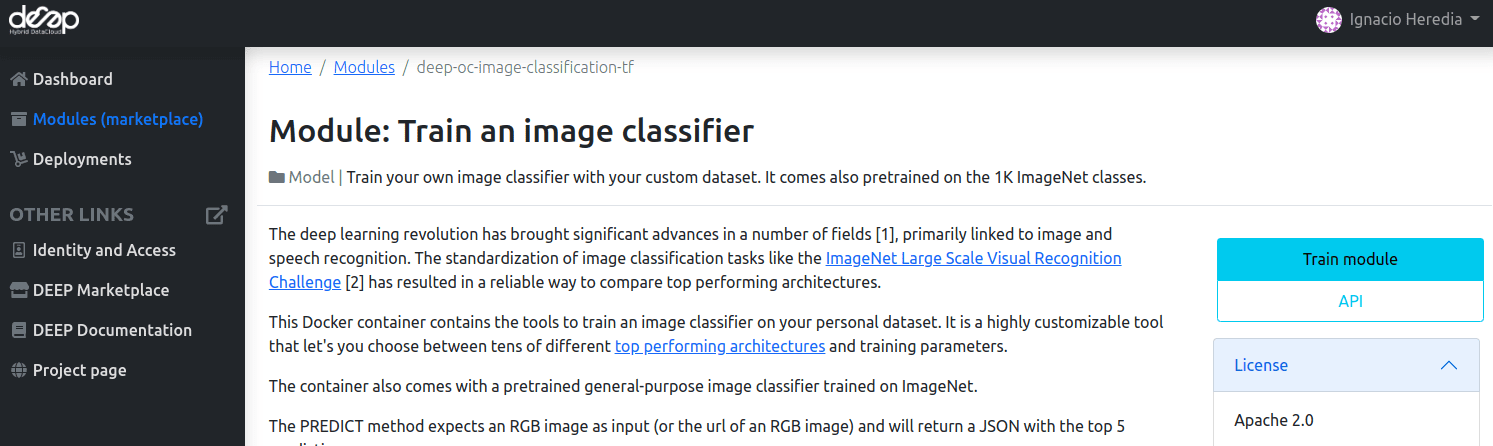
To deploy click in Train module and you will be redirected to a configuration page.
This page will allow you to configure mainly three aspects:
The computing resources of the new deployment. A user can select multiple CPUs and GPUs, the machine RAM as well as optionally choosing the physical site where the machine must be deployed.
The remote storage options, like tokens for authentication with Nextcloud.
The service to run. Currently, options include running the DEEPaaS API (recommended for fully developed modules where) and JupyterLab (recommended for developing code as well for cases where access to the bash console is needed).
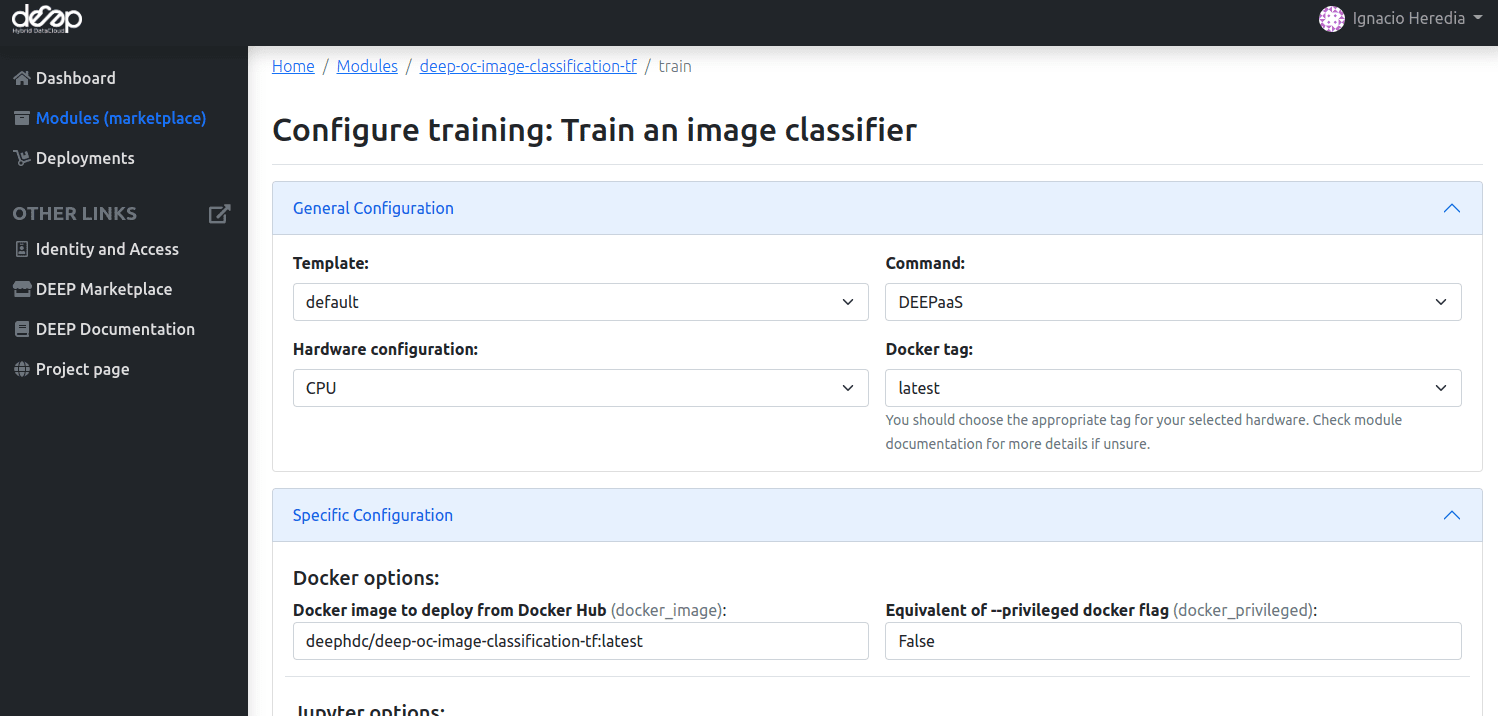
The are two steps in the configuration process:
First fill the General configuration. The parameters to configure are:
Templateloads different configuration files.defaultis the recommended option.minimalis the same as default but does not show remote storage options. This is equivalent to using the default option but leaving empty the storage options.
Commanddetermines which service to launch:For performing simple inference,
DEEPaaSis the recommended option, as no code changes are required.For retraining a module,
JupyterLabis the recommended option, as it offers access to Terminal windows which are needed to mount remote data into your machine.For developing a new module,
JupyterLabis the recommended option, as it offers the possibility to directly interact with the machine to write code.
Important
We do not provide the option to run both JupyterLab and DEEPaaS at the same time, as code changes performed subsequently via JupyterLab wouldn’t be reflected in DEEPaaS (which is launched with the initial codebase), thus potentially leading to confusion.
If you want to have access to both services in the same deployment, launch with JupyterLab.
In JupyterLab, open a Terminal window ( (New launcher) ➜ Others ➜ Terminal).
Then run deep-start --deepaas to launch DEEPaaS.
If you make subsequent code changes, you will have to kill the old DEEPaaS process and launch a new one.
Hardwarechooses the hardware type to run on:For inference and code development, we recommend using
CPUas they are low intensity tasks.For (re)training, we recommend using
GPUas this is a more demanding task.
Docker tagselects the appropriate Docker tags of your module (tags may vary across modules). You should choose Docker tag that match with the hardware you selected in the previous step. So if you selected a CPU, look forlatestorcputags. If you selected a GPU, look forgputag.
Once this is set, you can proceed to fill the Specific configuration:
Docker options, this is prefilled and should not be modified.Jupyter options, where you have to provide a password at least 9 characters long, so that nobody will be able to access your machine, which will be exposed on a public IP. You can leave this section empty if you are not launching JupyterLab.Storage options: where you have to provide the rclone credentials to be able to mount your Nextcloud directory in your deployment. Go here in order to find how to create them. You can leave this section empty if you don’t want to use remote storage.Hardware options: where you can specify the number of CPU and GPUs for your deployment, as well as the RAM memory.
Important
Deployments with excessive resources requests will likely fail to create. We will soon provide guidelines on what is considered reasonable. Please do not select multiple GPUs unless you are planning to perform multi-gpu training and the module’s README explicitly supports it (most of the modules don’t). Being mindful about resources requests will benefit everyone.
Other optionswhere you can provide some info about the deployment and change the initial command to be run.
Always fill first the General configuration as it will prefill the Specific configuration with sensible defaults. Then you can tweak the Specific configuration to your needs.
Once you are happy with the state of your configuration, click Submit and you will be redirected to the page listing
all the current deployments.
Managing the deployments
In the Deployments tab you have a view of all the deployments you have made so far:
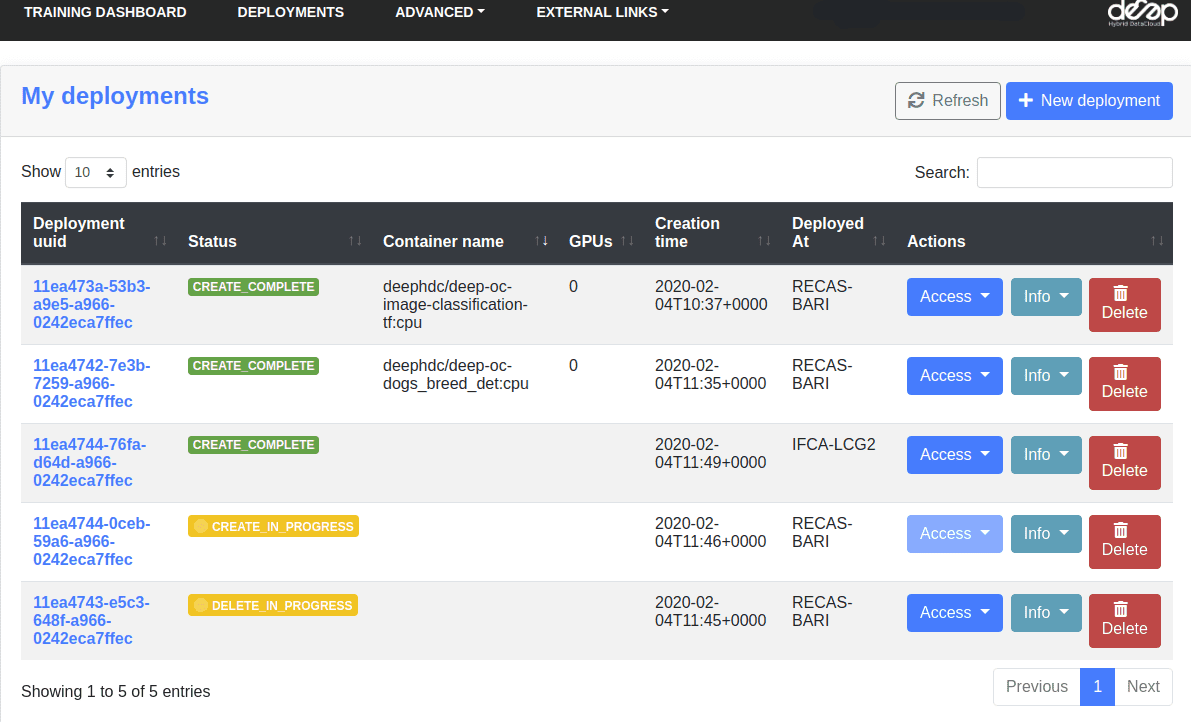
Under the Access button, you will find the URLs for:
DEEPaaS, only accessible if you launched with the DEEPaaS command or launched JupyterLab then ran DEEPaaS.JupyterLab, only accessible if you launched with the JupyterLab commandMonitor: this is the training monitoring page. Only accessible if the module has been coded to explicitly display monitoring (check the module’s README or training arguments) and if a training is currently running.History: this is the training history of the module. Only accessible if DEEPaaS is currently running.
Under Info you will find:
Detailswith some info about your deployments including error messages if you module failed somehow (send those error messages to the support email when asking for help).Show template: this is the raw configuration we used to deploy your module.
If your deployment is running DEEPaaS, you can click on the UUID of the deployments to access the deployments personal page and view things such as the training history, etc.

Important
GPUs are scarce resources, so we kindly ask you to limit the number of GPUs you are using to at most 1 per user (2 if really needed). Take into account that sometimes even failed created/deleted deployments might be consuming resources, so don’t forget to delete them.
And remember to do periodic review of your deployments (either CPU or GPU) to delete the ones you no longer use.